Top Ad 728x90

More Stories

6-Minute Caramel Recipe

by


Ingredients


1 cup granulated sugar

¼ cup water

½ cup heavy cream

1 tsp pure vanilla extract (optional)

A pinch of salt (to balance out the sweetness)


Preparation

Start Simple: In a medium-sized, heavy-bottomed pan, combine the granulated sugar and water. Ensure that the sugar is evenly moistened.

Heat it Up: Place the pan over medium-high heat. Allow the sugar to dissolve completely without stirring. Resist the urge to stir as this can cause the sugar to crystallize.

Observe the Change: Once the sugar has dissolved, keep a close eye on the syrup. It will start to bubble after a minute or two. The bubbles will get bigger and then smaller as the water evaporates.

Observe the Change: Once the sugar has dissolved, keep a close eye on the syrup. It will start to bubble after a minute or two. The bubbles will get bigger and then smaller as the water evaporates.

Seek the Golden Hue: After 4-5 minutes, the syrup will turn into a beautiful amber color. This is the caramel stage you’re aiming for.

Cool it Down: Immediately remove from heat. Slowly pour in the heavy cream while whisking continuously. Be cautious, as the mixture will bubble vigorously.

Add Flavors: Whisk in the vanilla extract and a pinch of salt until you have a smooth, silky caramel.

Serve and Impress: Drizzle over ice cream, pancakes, or any dessert of your choice. Enjoy the delightful taste of your homemade 6-minute caramel!


Expert Tips:

Pan Choice Matters: Using a light-colored pan can help you see the color change more easily.

Safety First: Caramel can burn quickly and is extremely hot. Always exercise caution.

Crystallization Woes: If you notice the sugar crystallizing on the sides of the pan, brush it down with a wet pastry brush.

The Secrets Behind Perfect 6-Minute Caramel:

The Sugar-Water Ratio: The combination of sugar and water is crucial. Too much water can dilute the caramel, while too little can cause burning.

Constant Vigilance: Keeping a watchful eye is essential. The transition from clear syrup to amber caramel can be quick.

Temperature Control: Ensure your burner maintains a consistent medium-high heat. Too hot, and you risk burning; too low, and it won’t caramelize in 6 minutes.

Serving Suggestions:

Decadent Breakfast: Drizzle over waffles, pancakes, or French toast and top with fresh berries.

Dessert Time: Enhance the flavor of brownies, cheesecakes, or puddings by adding a caramel layer.

Drink Enhancer: Add a spoonful to your coffee or hot chocolate for a caramel twist

These are my most popular bars. I usually make at least 500 of these at parties

by


Ingredients


Ingredient Quantity

Miniature marshmallows 2 packages

Butter, melted 2 tablespoons

White chocolate chips 2 packages

Red and green gumdrops 1 ½ cups


Preparation

1. Prepare the Marshmallow Mixture

Step 1: In a large microwave-safe bowl, combine the miniature marshmallows and melted butter.

Step 2: Microwave on high for 1-2 minutes, or until the marshmallows are soft and puffy.

Step 3: Stir the mixture until smooth and well combined.

2. Melt the White Chocolate

Step 1: In a separate microwave-safe bowl, melt the white chocolate chips in 30-second intervals.

Step 2: Stir between each interval until the white chocolate is smooth and creamy.

3. Combine the Ingredients

Step 1: Pour the melted white chocolate over the marshmallow mixture.

Step 2: Stir until evenly combined. The mixture should be thick and sticky.

4. Add the Gumdrop Candy

Step 1: Gently fold in the red and green gumdrops until they are evenly distributed throughout the nougat mixture.

5. Form the Bars

Step 1: Line a baking dish or tray with parchment paper or aluminum foil, allowing some overhang for easy removal.

Step 2: Transfer the nougat mixture to the prepared dish.

Step 3: Press it into an even layer using a spatula or your hands.

6. Chill and Set

Step 1: Place the baking dish in the refrigerator for at least 1-2 hours, or until the nougat

mixture is firm and set.

7. Slice and Serve

Step 1: Once set, remove the nougat mixture from the refrigerator.

Step 2: Use the overhanging parchment paper or foil to lift it out of the dish.

Step 3: Place it on a cutting board and slice it into bars or squares using a sharp knife.

8. Enjoy the Sweet Treats

Step 1: Serve the Four-Ingredient Nougat Bars on a platter.

Step 2: Store them in an airtight container until ready to 


enjoy.

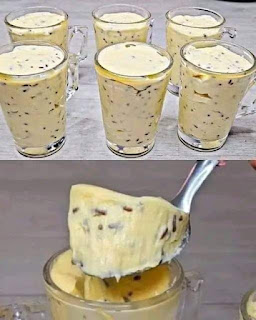
Chocolate Chip Vanilla Mousse

by


Ingredients


– 2 cups heavy whipping cream
– 1/2 cup granulated sugar
– 1 teaspoon vanilla extract
– 1 cup mascarpone cheese or cream cheese, softened
– 1/2 cup mini chocolate chips


Preparation


1. **Whip the Cream:**
– In a large mixing bowl, combine the heavy whipping cream, sugar, and vanilla extract.
– Using an electric mixer, whip the cream on medium-high speed until soft peaks form.
2. **Add the Cheese:**
– Add the mascarpone or cream cheese to the whipped cream.
– Continue to beat on medium speed until the mixture is smooth and firm peaks form.
3. **Fold in the Chocolate Chips:**
– Gently fold in the mini chocolate chips with a spatula, ensuring they are evenly distributed throughout the mousse.
4. **Serve:**
– Spoon the mousse into serving glasses or cups.
– Chill in the refrigerator for at least 1 hour before serving to allow the mousse to set.
5. **Garnish:**
– Optionally, top with additional chocolate chips or a sprinkle of cocoa powder before serving.
This creamy and delicious chocolate chip vanilla mousse makes a perfect dessert for any occasion. Feel free to experiment by adding other ingredients, such as fruit or nuts, to create your own version. Let me know if you have any questions or need further assistance!

Cream Cheese Chicken Enchiladas

by


Ingredients

8-10 flour tortillas

1 package (8 ounce) cream cheese, room temperature, divided [1/2 and 1/2]

1-2 (4 ounce) cans of green peppers

3 cups cooked grated chicken

2 cups Mexican cheese, grated, divided [1 cup; 1 cup)

2 cups low-sodium chicken broth

3 tablespoons of unsalted butter

3 tablespoons all-purpose flour

1 tablespoon lemon juice

1 teaspoon cumin

1/2 teaspoon chili powder

Kosher salt and freshly ground pepper to taste

Fresh coriander, garnish, optional.


Preparation


Preheat oven 350 degrees F and grease a 9 x 13 inch baking dish with a little nonstick spray.

In a mixing bowl, mix half cream cheese, chicken, cup of cheese, lemon juice, cumin and chili powder, and season with salt and pepper if desired.

Take 1 tortilla and fill it with 2-3 tablespoons of the chicken mixture, then place the seam side on the baking dish. Repeat with the rest of the tortilla and the filling.

In saucepan on medium heat, dissolve butter. Beat in flour & cooking for 2-3 minutes, or until golden brown.

Season with salt and pepper, then gradually beat in the chicken and green pepper broth. Add the remaining half of the cream cheese and cook for 5-7 minutes, or until firm.

Remove from heat and pour green chilli sauce over the enchiladas.

Putting rest cheese on top.

Placing baking dish in oven and baking for 23-26 minutes.

Optional: roast for 3-5 minutes, or until it’s light brown.

Take it out of the oven and let it rest for 10-12 minutes

Garnish with fresh coriander, optionally

Shh, this my secret weapon for keeping my husband in a good mood – he loves it

by


Ingredients

The following ingredients are needed: three cups of cold mashed potatoes, one big egg, one cup of shredded cheddar cheese, quarter cup of chopped chives, quarter cup of all-purpose flour, and half a teaspoon of garlic powder.


1/4 cup of grated Parmesan cheese, reserved for rolling


– Ghee or cooking spray for use in pans


Preparation

1. Spray or oil a small muffin tin with cooking spray and set oven temperature to 400 degrees Fahrenheit (200 degrees Celsius).


2. In a large mixing basin, thoroughly incorporate the chopped cheddar, chives, cold mashed potatoes, egg, flour, garlic powder, salt, and pepper.


3. Coat each dough ball with grated Parmesan cheese after rolling it into 1-inch balls.


4. Carefully push the greased potato balls into the muffin pan’s cavities to create a puff shape.


5. Puffs should be baked for around 15 to 20 minutes, or until they turn a golden brown and are somewhat crunchy on top.


Step 6: After a few minutes of cooling, take them out of the pan. Serve when still warm and savor the sight of them vanishing!

Changes & Hints – Incorporate other components for a novel touch—imagine crumbled cooked bacon, sliced jalapeños for heat, or substitute cheddar with your preferred combination of cheeses.


Instant mashed potatoes are a time-saving alternative that you may use in a pinch. It is important to wait until the mixture reaches room temperature before handling it.


These little puffs are perfect for freezing. Freeze them on a baking sheet for a few minutes when they’ve cooled entirely, and then put them in a freezer bag. Reheat them in the oven until crisp and toasty, then serve.


– Reduce the fat content by replacing half of the potatoes with mashed cauliflower and adding low-fat cheese. Even with a few less calories, it tastes fantastic.

Do not be hesitant to experiment with your cuisine; after all, the joy of cooking is in giving it your own twist. If you’re looking to expand your culinary horizons, start with these Cheesy Mashed Potato Puffs.

Cheesy Garlic Breadsticks

by


Ingredients


1 pound of pizza dough, either handmade or purchased


2-tbsp melted unsalted butter


2 minced garlic cloves


1/2 teaspoon of salt


one-fourth of a teaspoon of pepper


One cup of mozzarella cheese, shredded


a quarter cup of Parmesan cheese, grated


One teaspoon of dried oregano, if desired


If desired, serve with marinara sauce for dipping.


Preparation


Get the oven ready: Set the oven temperature to 425°F, or 220°C. Grease or line a baking sheet with parchment paper.


Roll out the dough: Flatten the pizza dough to the thickness you like on a board dusted with flour. Roll it out to a thickness of around 1/2 inch if you desire breadsticks that are thicker. Flatten the dough slightly to get thinner breadsticks.


Dividing into sticks: To make the dough strips, use a pizza cutter or a sharp knife and cut them approximately 1 inch wide.


Get the garlic butter ready with: Put the melted butter, garlic powder, salt, and pepper into a small bowl and stir to combine.

The dough should be brushed: Spread the garlic butter mixture over the dough strips’ surfaces.


For the cheese topping, evenly distribute the shredded mozzarella cheese over the dough strips. Next, finish by topping with grated Parmesan.


Season: If you want to add a little more flavor to the cheese, you may sprinkle some dried oregano on top.


Carefully twist each strip of dough and arrange them on the baking sheet that has been prepared, making sure to leave some space between each breadstick.


Prep the oven to 400 degrees Fahrenheit. Bake the breadsticks for 12 to 15 minutes, or until they get a golden brown color and the cheese is melted and bubbling.


After a few minutes of cooling, serve the breadsticks straight from the oven. If preferred, serve warm and dip with marinara sauce.


These Cheesy Garlic Breadsticks are really mouthwatering.

CHICKEN STRIPS

by


 Crispy chicken strips have earned a beloved spot in the hearts of food enthusiasts around the world. This tantalizing dish, known for its crunchy exterior and juicy interior, is a favorite among both children and adults. The secret to its popularity lies in the perfect balance of flavors and textures, making it an irresistible option for any meal. Whether you’re hosting a casual get-together or looking for a quick dinner solution, crispy chicken strips never disappoint.


The recipe for crispy chicken strips is straightforward yet ingenious. It all begins with succulent chicken breast, meticulously cut into strips and seasoned with salt and pepper. These strips are then lightly floured before being dipped in beaten egg. The real magic happens when the chicken strips are coated in crushed roasted cornflakes, giving them that signature crunch. Fry them in hot extra virgin olive oil until they reach a golden-brown perfection. The result is a batch of crispy chicken strips that are both tender and flavorful.


What makes crispy chicken strips even more delightful are the endless pairing possibilities. Serve them with a side of ketchup for a classic touch, or elevate the experience with a variety of dips like honey mustard or barbecue sauce. For a Mediterranean twist, pair them with pitted black olives. Additionally, these strips go wonderfully with a fresh salad or a plate of steamed vegetables, creating a balanced and satisfying meal. The versatility of crispy chicken strips ensures they can seamlessly fit into any dining scenario, bringing joy to the table every time.Ingredients:


Chicken breast

Roasted cornflakes

Flour

Beaten egg

Salt

Black pepper

Extra virgin olive oil

Ketchup

Pitted black olives

Preparation:

1. Cut the chicken breast into strips that we season with salt and pepper and lightly flour.

2. Then, we pass these strips through beaten egg and then through the toasted cornflakes, which we have crushed a little with our hands.

3. We fry them in extra virgin olive oil, very hot, until they are golden brown, take out and let rest on kitchen

Top Ad 728x90

Top Ad 728x90